
Setting Up Facebook Ads for Local Elections
Learn to properly setup Facebook for your campaign.
Facebook Setup for Political Campaigns
A strong Facebook campaign requires a solid foundation. In the second part of this Facebook guide, learn how to build the foundation you will use for your ads. We will cover:
- Setting up Facebook for Political Campaigns
- Creating Facebook Campaigns
- Targeting Facebook Ads for Political Campaigns
- Choosing Images, Text and Videos to Use on Facebook Ads
It sounds like a lot, but estimate about 20 minutes to take care of everything before the political verification. Then, you’ll have to submit some paperwork and wait for a few days before you’re street legal. I’ll walk you through each step, so don’t worry!
If you want to learn more, check out the other sections of this guide:
- Why Facebook Matters for Political Campaigns
- How to Integrate Facebook With Your Campaign (coming soon)
If you need additional help, watch the video tutorial my digital marketing agency 9 Clouds created for auto dealers. Much of the setup will be the same for you.
Setting Up Facebook for Political Campaigns
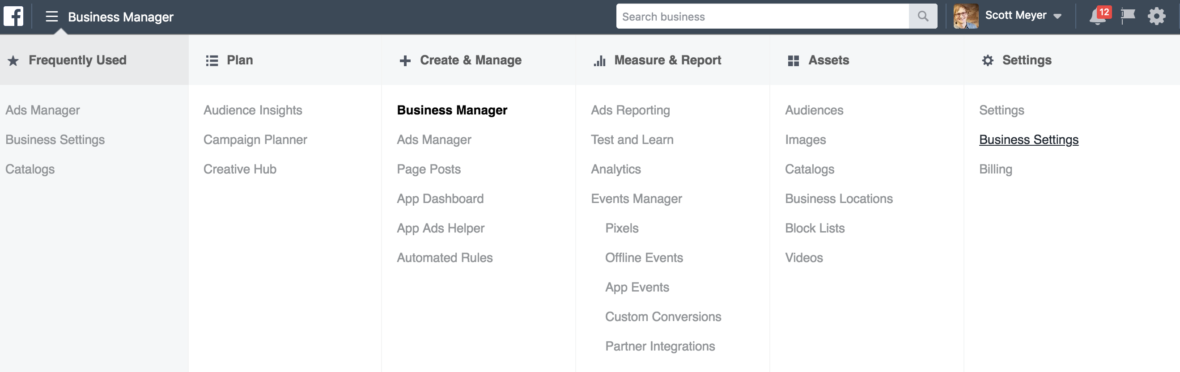
Business Manager is your hub for all things Facebook. This is where you will check your page and comments, as well as manage your ads. Moving forward you will manage your page and ads both in the Business Manager.
You want to use Business Manager because it will allow you to control access to your resources and provide additional features for your campaigns, such as retargeting, measuring the success of your ads and Instagram integration.
Visit business.facebook.com to get started. Click “Create Account.” You will login with your personal Facebook account. Name your Business Manager and choose the email you want to use within Business Manager. You can use a campaign or professional email if you like, but no one outside of your Business Manager will see it.
When you have created your Facebook Business Manager, click on the three lines at the top left, what I affectionately refer to as the “hamburger.” In the last column, find Business Settings. There you will set everything else up.
The Facebook Four
There are four pillars to a successful Facebook foundation: page, ad account, pixel and offline event set. If you want to be fancy, add Instagram in there too.
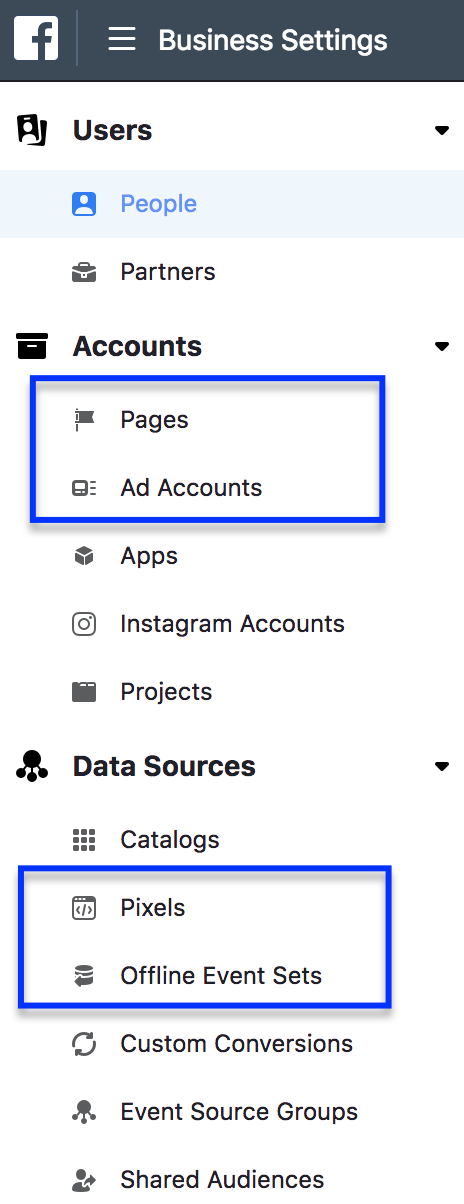
Facebook Page
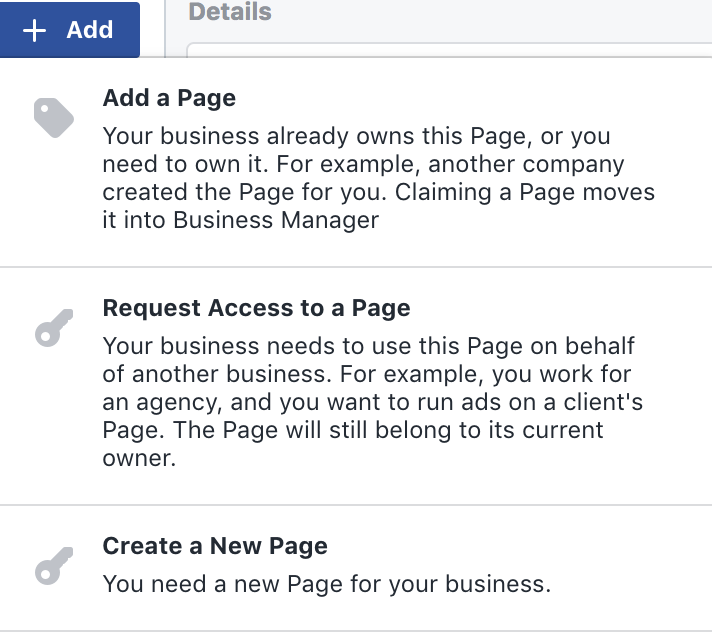
Click first on Pages under Accounts. In the second column, click the blue +Add button. There you will want to Add a Page You Already Own…unless of course you don’t have one! In that case, create a new one.
Ad Accounts
Same idea here. Click the blue +Add button. Most of the time you will be creating a new ad account.
Ad accounts are where all of your ads on Facebook will live. Name your ad account something like Scott Meyer for City Council to make it obvious for any partners which ad account is yours.
You can think of an ad account as a credit card. Every ad account has one payment method (usually a credit card), so if you have multiple pages, create multiple ad accounts if you want the billing separated.
I typically recommend creating an ad account for every website you are using. For most candidates, you’re hopefully only willing to go through this for one race at a time!
Facebook Pixel
The Facebook Pixel is similar to Google Analytics in that it will track people who visit your website. The Pixel will then allow you to show ads to people based on their behavior on your website. If they look at a certain topic, say healthcare, you can then show them a healthcare ad.
The Facebook Pixel will also help you measure results from your ads so you know how many people clicked an ad and visited certain pages or took a certain action like donating or signing up for your email list.
Again, click +Add to create your Pixel. After you create a Pixel, as well as the other “Big Four,” you will always have the option to assign people or partners to the asset. You will most likely be there by default. If you are working with an agency or consultant. Add them as a partner.
Finally, for a Pixel you will want to associate it with your Ad Account which you created above. Click Assign Ad Account and match it up.

Offline Event Sets
Facebook allows you to upload a list of subscribers/donors/customers/etc. to identify if they saw a Facebook ad before they did what you wanted them to do. In order to have this incredible super power, you need to first setup an Offline Event Set.
Again, click +Add. Again, assign ad account so Facebook automatically tracks who is clicking and is ready to match them to your list you import in the future.
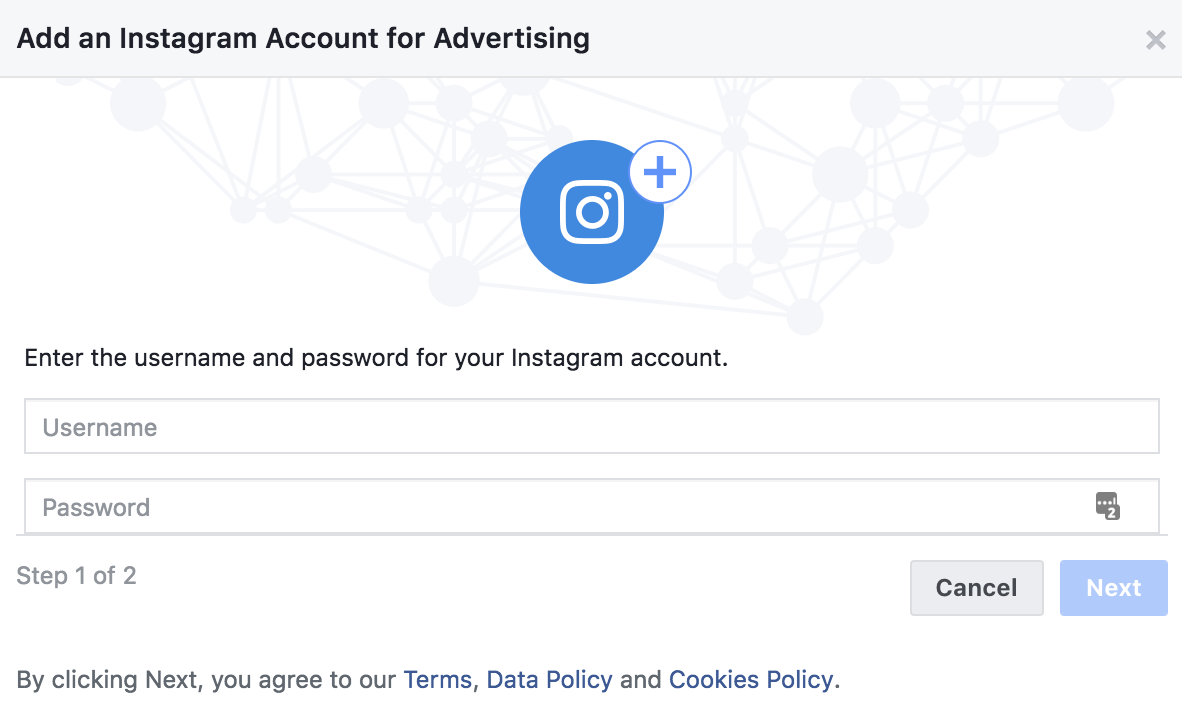
Instagram is a powerful channel to connect with supporters. I highly recommend using it to showcase your personality and amplify your efforts of meeting people and learning about the issues in your community.
You will need an Instagram account. Then enter your username and password. Poof! Now you’re ready to run Instagram ads.
Facebook Political Verifications (ID, disclaimer)
Facebook’s been under pressure to better vet political ads. To run political ads, you will need to go through an ad authorization process. As Facebook notes:
The authorization process for advertisers running ads that include political content is only available for US advertisers who reside in the US and who plan to target the US with ads. In addition, starting May 7, 2018, any ads that include political content and target the US will be eligible to be added to the archive of ads with political content, even if the advertiser who created them doesn’t reside in the US and/or hasn’t completed the ad authorization process.
Currently, you can only set up and manage ad authorizations from a desktop computer.
Desktop computer?! LOL. Anyways, take a deep breath as Facebook lays out the steps for authorization, from the same page as above.
If you’re a US advertiser and an advertiser targeting the US and plan to run ads that include political content, you’ll need to go through an ad authorization process. Below, we’ve outlined the information you need and the steps you should take to get authorized to run ads that include political content.
Ad Authorization checklist
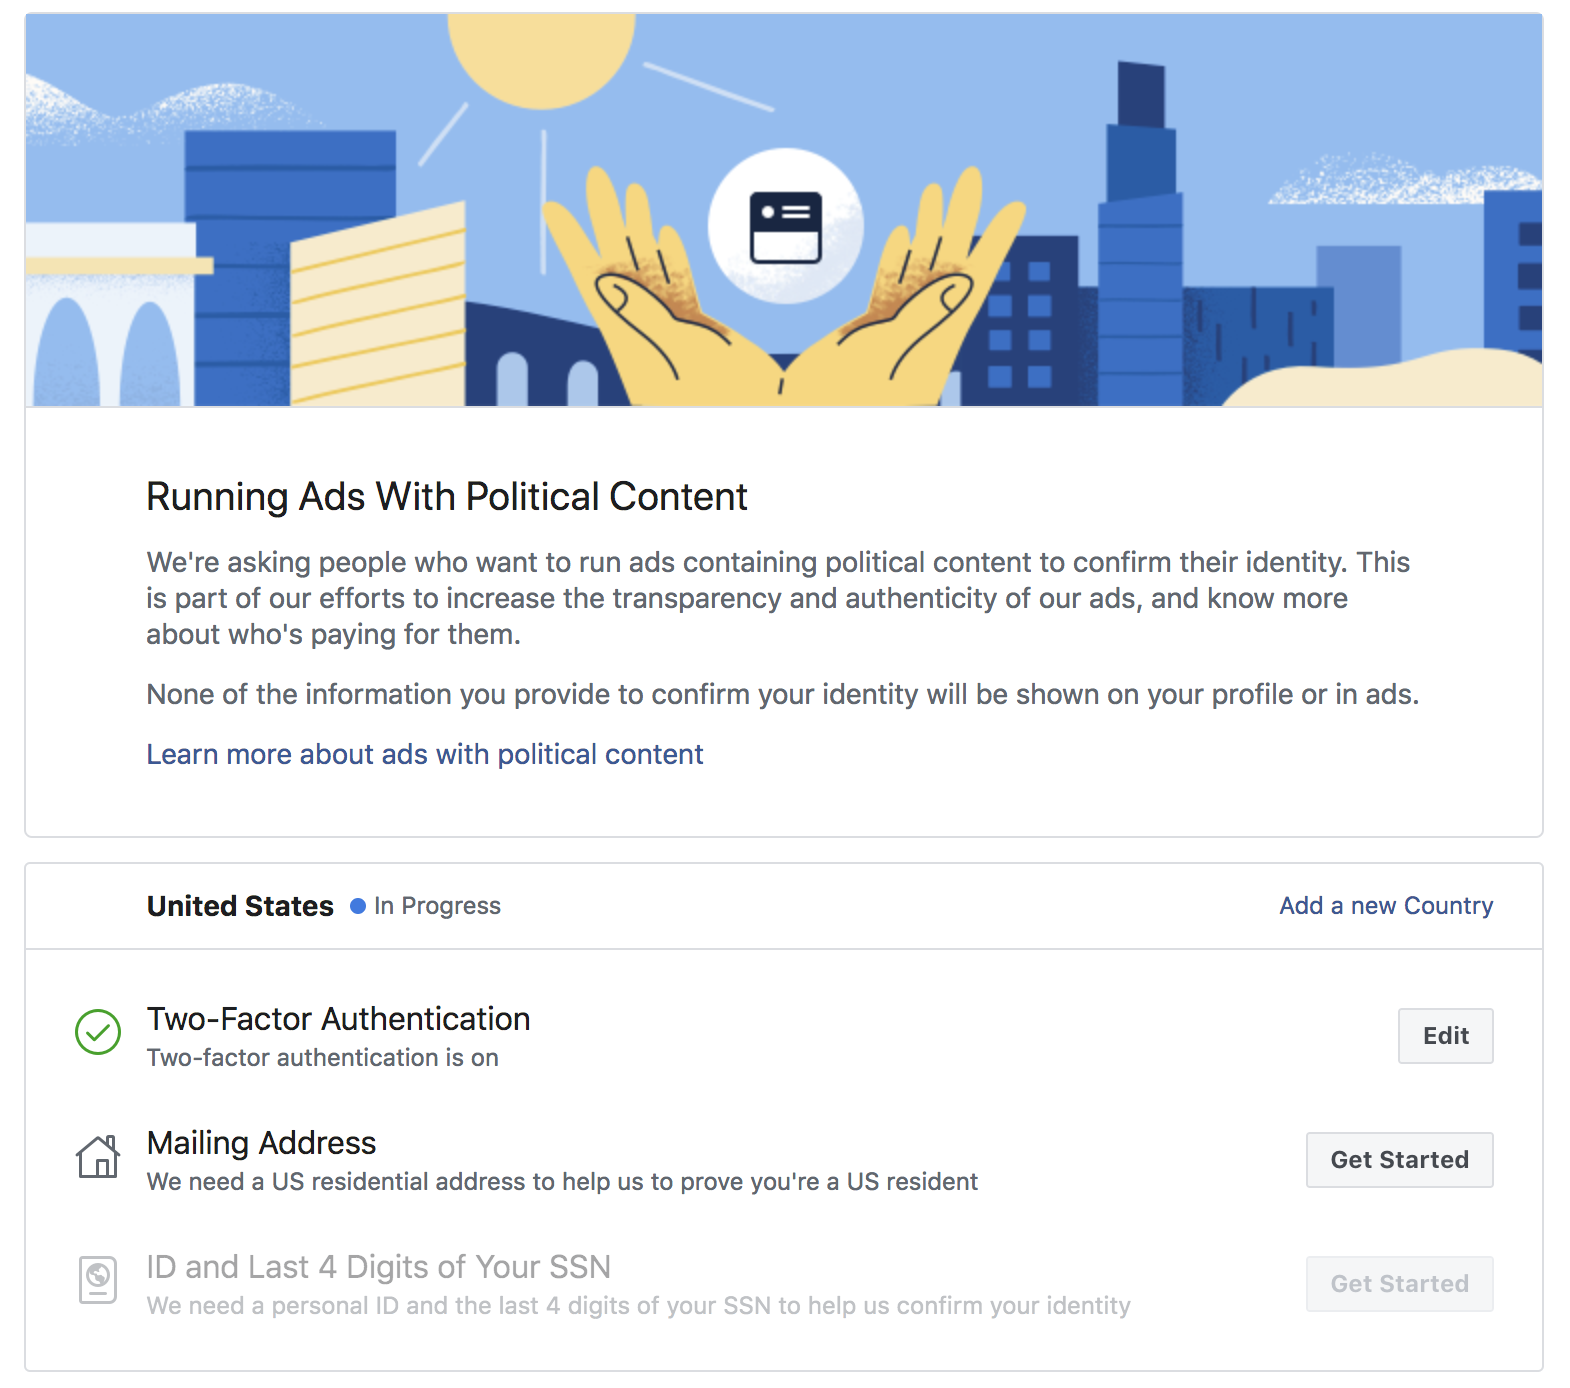
Before you begin the ad authorization process, you’ll need the following:
You’ll want to have the following materials and information available to confirm your identity:*
*You’ll be required to submit information, including your residential address, a Driver’s License or Passport and the last 4 digits of your Social Security number. The only reason we collect this information is to confirm your identity. We use trusted service providers to do this. Your information won’t be shared on your profile, in your ads or with other Admins on your Page or ad accounts. After we confirm your identity, we’ll delete this information from our systems. This normally happens within 6 weeks. If you’d like more information about how we handle personal data, please see the Facebook Data Policy.
In addition to the Page Admin who’s creating the disclaimers, any person creating, modifying, publishing or pausing ads that include political content will need to have their identity confirmed.
Step 1) Confirm your identity
Complete the ad authorization process, by confirming your identity:
- Go to your Facebook Page. If your Page is managed in Business Manager, you’ll need to access your Page through Business Manager to complete the rest of the steps.
- Click Settings in the top-right corner.
- In the list on the left, click Authorizations.
- Below Step 1: Confirm Your Identity, click Get Started.
- Click Get Started again.
- Set up 2-factor identification. (If you’ve already set up 2-factor identification, you can skip to step 7 below.):
- On the Secure your account with 2-factor authentication section, click Next.
- Select a security method and follow the steps to complete the set up.
- When you get to the Enter your confirmation code section, click Next.
- Choose the settings you’d prefer and click Next.
- In the Enter Mailing Address section, update the fields with your information and click Send.
You should see a confirmation notice letting you know that a letter will be sent to your address. This letter will include a verification code. The code is connected to your account, so nobody else can use it.
- Next, click Enter ID and SSN. Select the type of identification you’d like to use. Currently, only US Passports and US drivers licenses will be accepted. After selecting the form of identification you’d like to upload, click Next.
- Click upload an image. Any images you upload will need to be either JPG or PNG files and be at least 1,500 x 1,000 pixels in size. Keep in mind that the address on your photo ID doesn’t have to match the address where you currently receive mail.
- After you successfully upload your image, click Next.
Note: Your photo ID should be approved or denied within minutes. If denied due to the quality of the photo uploaded, you can try again.
- Enter your ZIP Code, and click Next.
- Enter the last 4 digits of your Social Security number, and click Next.
- Click Submit.
After receiving your letter in the mail, follow these steps:*
- When your letter arrives, visit the URL specified on your letter.
- In the Confirm Your Identity section, enter your code.
- Click Submit Code.
- After entering your code, your ID confirmation should be complete. The ad authorization will be applied to all Pages and ad accounts you have admin access to and any you’re added to in the future.
*The letter should arrive at your address within 10 days. You can check the status of your letter by returning to the Authorizations screen and clicking the View button next to your name. If your letter doesn’t arrive within 10 days, you can request a new at this URL: https://www.facebook.com/id.
Once you’ve completed the ad authorization process, you’ll need to provide a list of the ad accounts that will be used to fund your Page’s ads that include political content, link those ad accounts to your Page and enter a disclaimer for each.
Linking your ad accounts
Link your ad accounts and set up disclaimers:
- Go to your Facebook Page. If your Page is managed in Business Manager, you’ll need to access your Page through Business Manager to complete the rest of the steps.
- Click Settings in the top-right corner.
- In the list on the left, click Authorizations.
- Below Step 2: Link Your Ad Accounts, click Begin.
- Before you can begin, you’ll need to agree to comply with Facebook’s Terms and Conditions by clicking Accept.
- By default, any ad accounts you’re an ad account advertiser or admin on will appear automatically, and you can select the ones that will be used to fund your Page’s ads that include political content. If you need to add additional ad accounts, you’ll need to have the numbers associated with each of the ad accounts you’d like to add. Learn how to find your ad account IDs. Once you have your ad account IDs, add them 1 at a time and click Add. Your ad account information will appear as you add it. In the Enable section, check the box adjacent to each ad account you’d like to use to run ads that include political content. When you’re done, click Next.
- Each ad you create will have a “Paid for by” disclaimer. You’ll need to create a disclaimer for each ad account you’ve added that includes information on the person or entity who paid for the ads. Once you’ve added your disclaimers, click Next.
Note: Any disclaimers you create must accurately reflect the organization or person paying for your ads. The “Paid for by” disclaimer does not take the place of any legally required disclaimer and disclosure – advertisers have an independent obligation to make sure their ads comply with all applicable laws. We’ll review each disclaimer and check that it adheres to our advertising policies.
- Review your changes, and click Submit.
After completing these steps, review information on roles and permissionsto see if you’re ready to start running ads that include political content.
Learn more about what your ads that include political content will look like.
There you have it. A simple 25-step process ?
Creating Facebook Ad Campaigns
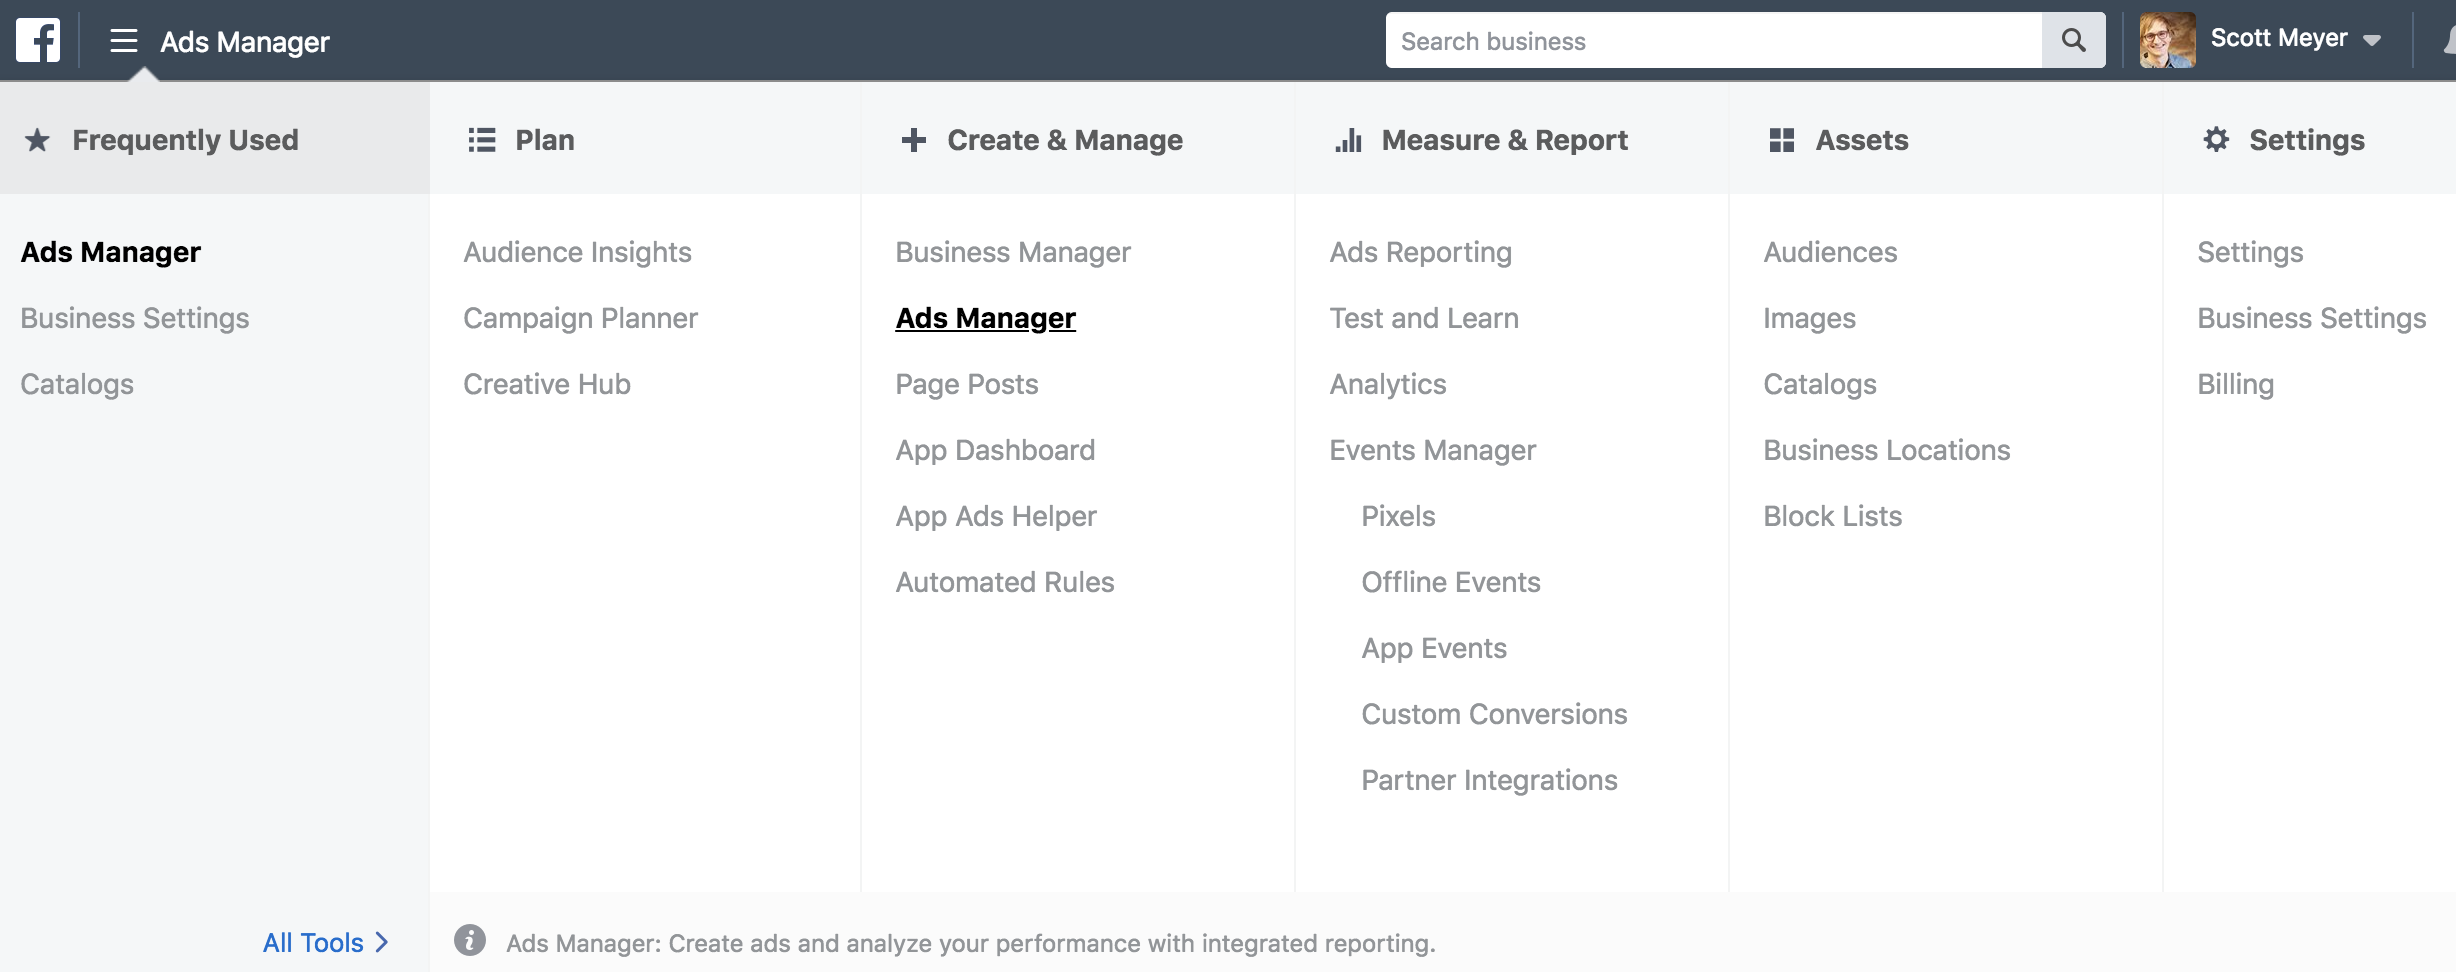
Now that you are setup and ready to run ads, you will be spending most of your time in the Facebook Ads Manager. To get there, click on the hamburger (those three lines in the top left), choose All Tools and in the third column click Ads Manager.
 Facebook ads are broken down into three steps:
- Campaign – This is your why. Why are you running the campaign? Is it to get more video views, form submissions, traffic to your website, or messages from Facebook users?
- Ad Set – This is your who. Who will see your ad? Here you will use demographics, behavior and interests to find the best audience for your campaign. You will also decide when your ads will show, how much you will spend and how you will be charged for your ads.
- Ad – This is your what. What are you going to say in your ad? This is where you add the photo, video and/or text that people will see in your ad campaign.
“Campaign is your why. Ad set is your who. Ad is your what.”
Campaigns: Choosing Your Objective
Facebook offers 11 different objectives for your campaigns. The objective is essentially why you are running the campaign (and how Facebook will measure success and charge you for it). Let’s walk through the 8 objectives candidates might actually use.
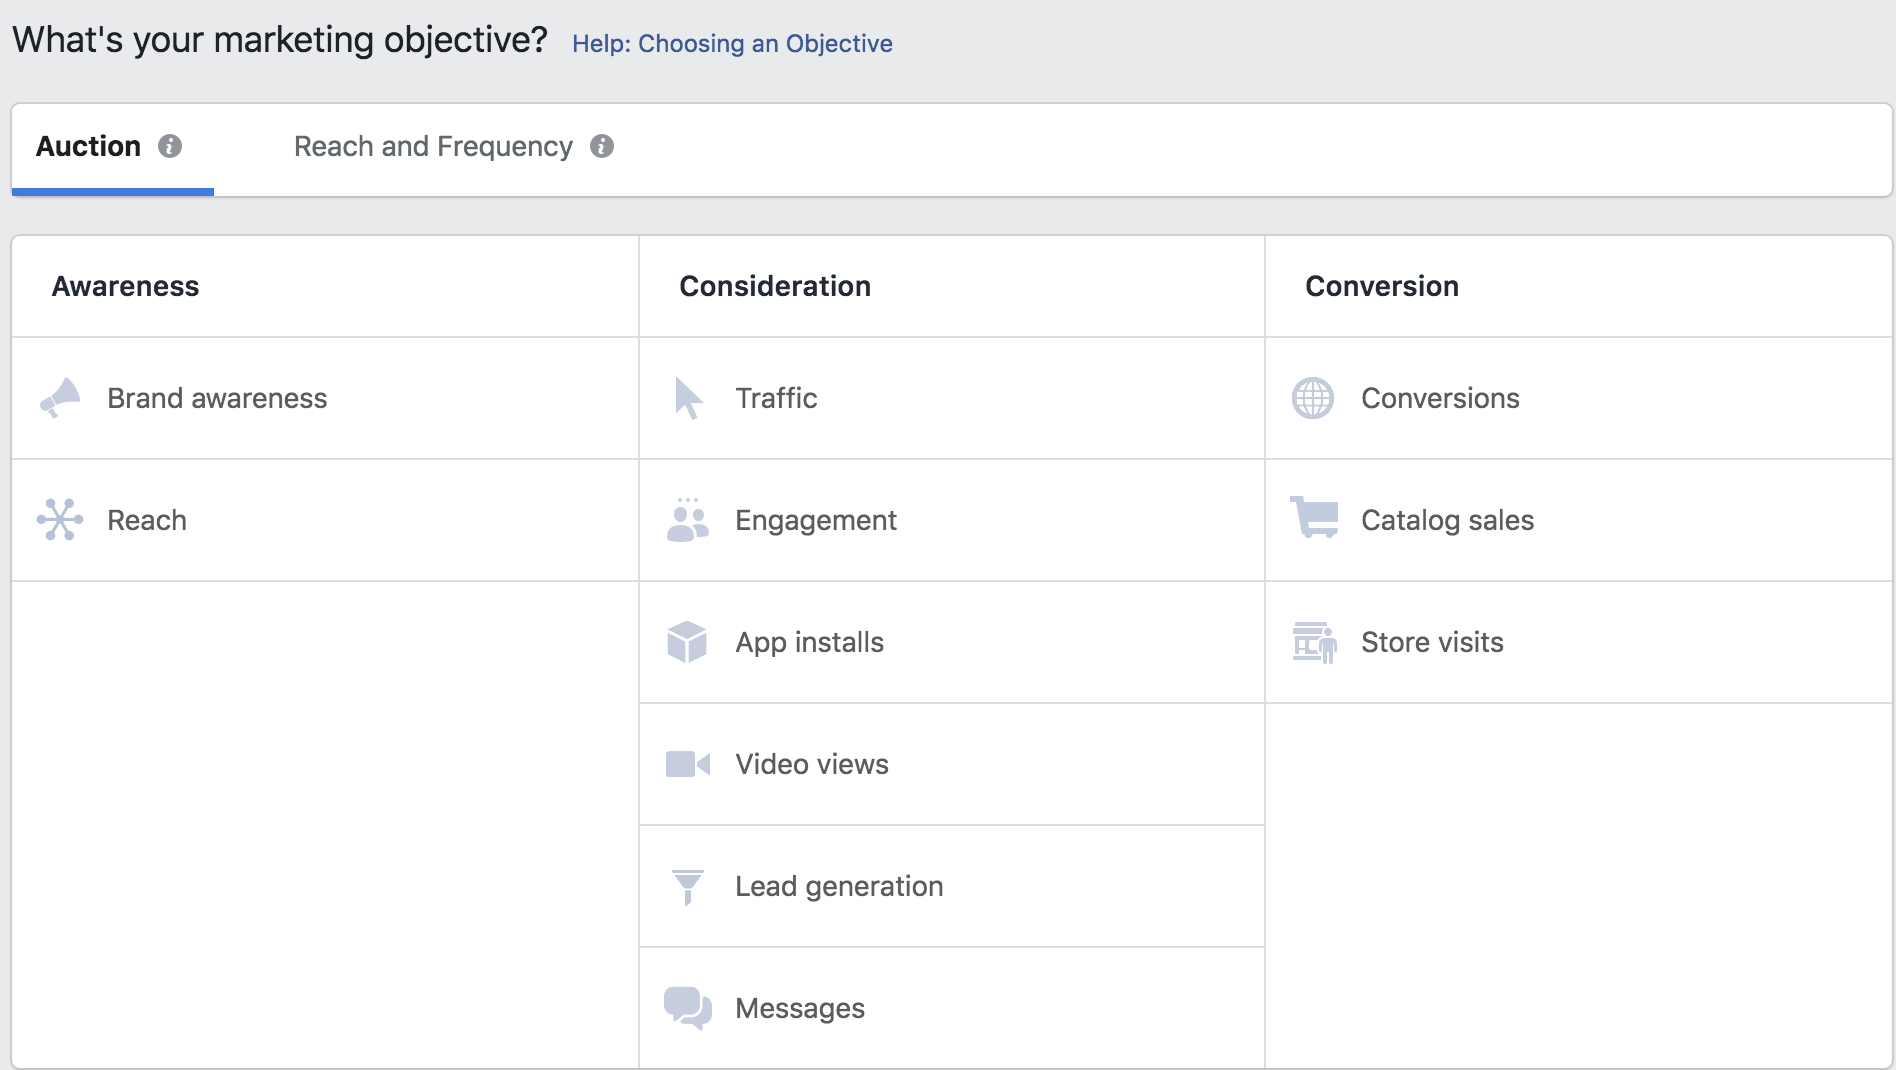
Awareness: Brand awareness and Reach
Brand awareness is running ads to people likely to be interested in your ads. Facebook refers to this as “Ad Recall Life”:
We’ll serve your ads to maximize the total number of people who will remember seeing your ads.
Reach is running your ad to be seen by as many people as possible. You also have the flexibility to choose how often (frequency) someone sees your ad (e.g. 1 time every 7 days).
Both of these objectives are charged by impressions, meaning how often it is displayed for users. This is a bit squishy in my mind. I like to stay away from these and generally use ads that are charged by action (such as a click or message).
Consideration: Traffic and Engagement
Traffic is running ads that drive web traffic to your website. Facebook charges you when someone actually clicks on your ad, know as Cost Per Click or CPC.
Engagement is a campaign focused on generating likes, shares, comments or event responses. I would encourage you to stay away from paying for likes because they don’t matter much anymore. Instead, use this objective as a way to get an important announcement seen by a lot of people, or better yet, specific people.
As an example, if you’re running for school board and you want to share your position on the local bond issue, you could run an ad telling everyone what you believe. What would be more powerful is to post your announcement on Facebook, and then promote the post using an engagement objective. Target the ad to teachers in your community, so teachers comment on the post and share the post with their friends. In this way, your message is shared by teachers in the community instead of you trying to share it on your own. This social capital goes a long ways for local campaigns when specific individuals are often keys to a successful campaign.
Consideration: Video Views
I love video on Facebook. Not only is it cheap (often 1 or 2 cents per view), you can subtitle it so people can “watch it” even without their sound on. What’s more, you can use video views as a qualifier for other ads.
For example, you might run a video announcing your campaign. Anyone who watches at least 10 seconds of it could then receive a second ad inviting them to donate to your campaign. In this way, video is a great way to reach and qualify supporters at a low cost.
Consideration: Lead Generation and Messages
Lead generation ads capture information for you directly on Facebook. When someone clicks on your ad, they can fill out a form without leaving Facebook. The best part is that Facebook automatically fills in the form with the information Facebook already has (e.g. name, phone, email, etc.). You can then export these forms into a spreadsheet for use in email marketing, phone calls, door knocking, etc. The only problem with lead generation ads is that few people fill them out, and they’re usually quite expensive ($20-30 per lead form is common).
Message ads start a conversation between a Facebook user and your Facebook page (hopefully you!). When the person clicks the ad, it opens a Facebook Messenger conversation. If they start chatting with you, you have full access to their public profile, meaning you can get their name, email, phone, etc. without having them fill out a form.
Messages are a great way to communicate with voters at scale. Imagine running an “Ask the Candidate” campaign using Messenger. Your ad could run during certain hours of the day. When someone clicks the ad, you are available to answer their questions (and get their information). In my experience, Messenger ads average around $2 per conversation (message).
Conversion: Conversions
While most of the conversion options will not apply for candidates, the conversions objective is perfect if you are trying to get web visitors to do something specific on your site like donate or join your email list. Facebook will measure which individuals take the action you want and optimize your ad to show to more people like them.
Targeting Facebook Ads for Political Campaigns
What makes Facebook and Instagram so powerful is that they have our attention and our data. On the second step of building an ad after you have chosen your objective, you will build your ad set. This is where we define the who, in terms of who will see your ad. In order to find the perfect audience, you can take advantage of the incredible targeting power in Facebook.
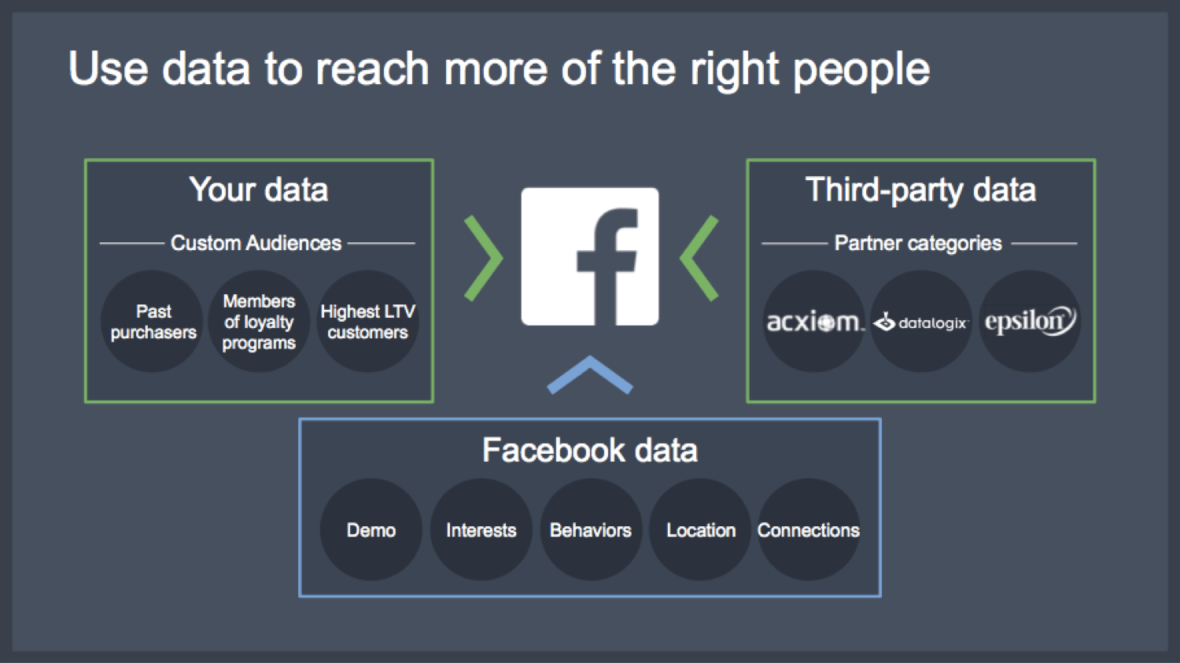
Facebook has access to three general types of data that can be used for targeting: Facebook data, 3rd party data and 1st party data.
Facebook Data
Facebook data is all the information we give Facebook when we sign up and use our Facebook accounts. This includes our demographic information, such as how old we are, where we went to school and our marital status. It also includes what we do on Facebook, such as who we like, what topics we talk about and the photos and videos that we view. Based on all of this activity, Facebook can identify demographic, behavioral and interest information.
3rd Party Data
In addition to Facebook’s data, Facebook purchases data from other data providers, such as Oracle or Equifax. This includes financial information, vehicle registration information and details on what you purchased with your credit card.
Due to the recent privacy pressure, Facebook is moving away from offering this data natively on their platform. The same information can still be obtained if it is requested directly from a data provider, such as Oracle.
1st Party Data
The most powerful, and under-utilized data, is first party data. This is information that you upload directly to Facebook to enable targeted ad campaigns.
A political campaign could upload lists of voters, supporters, donors, etc. to show ads specifically to those people. Even more powerful is to use these lists as “look alike” audiences, which is when Facebook will find similar people to the individuals on your list.
For a campaign, this is the quickest way to grow your message to the best audience. Upload your best supporters, ask Facebook to find more people like them in your district, and share your message with that look alike audience.
Note that your first party data can also be excluded, so if you don’t want to spend money on people you know will already support you, you can upload a list as an exclusion.
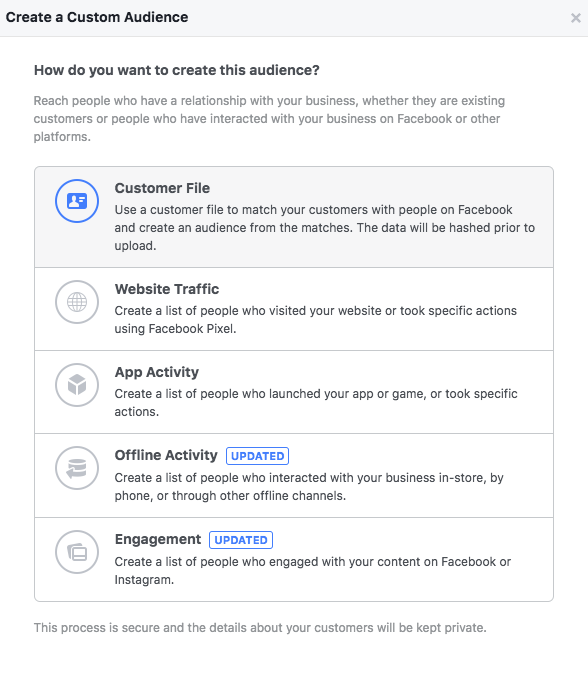
To take advantage of first party data on Facebook, just click Create New under Custom Audiences, or select an audience you have already created.
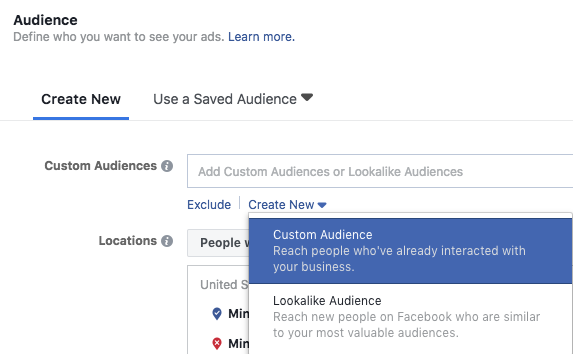
You can create an audience based on a number of data points. Most commonly you will choose Engagement, meaning people who have done something on your Facebook page, Website, meaning people who have been on your website, or Customer File, meaning a list you will manually upload.
At minimum, you will want to have email and/or phone number. Once you have uploaded your audience, you can return to the beginning and build a Lookalike audience based on your custom audience.
After you choose your custom audience or audiences, you can further filter your list with all of the geographic, interest and behavior targeting explained below.
Audience
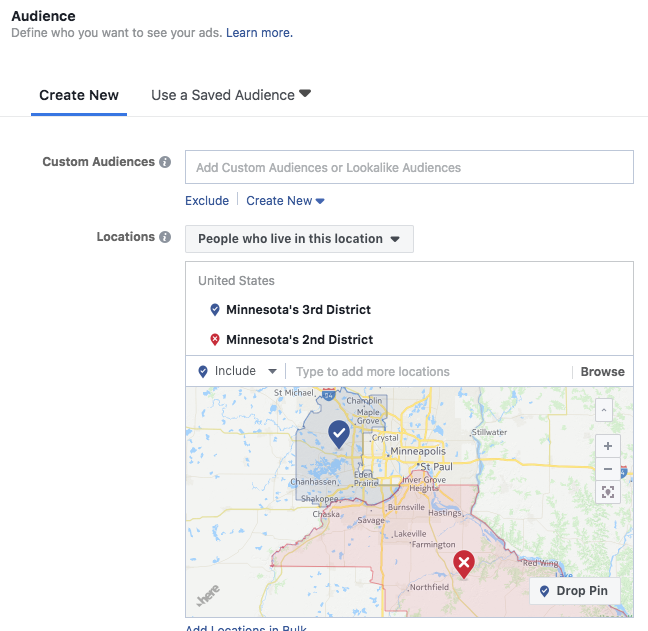
While custom audiences are incredibly powerful, the most common ad campaign for a political candidate will start underneath Audience with geographic information.
Type in the city, zip code, address or congressional district where you want to target your ads. Notice that you can target only people who live in your geographic target. You can also click the small downward arrow next to your location and exclude it. One use of this would be to target an entire congressional district or city, but exclude the zip codes that are less supportive of your platform.
After geography, edit the age and gender as needed.
Then, head down to the Detailed Targeting. This is where you find different ways to target people based on their interests, demographics or behaviors.
Important for political candidates is the political information Facebook generates on its users. As you can see below, Facebook makes it easy to show your ads to people likely to support your message. Combine political affinity with demographic information or education information, and you should be able to quickly identify your most likely supporters.
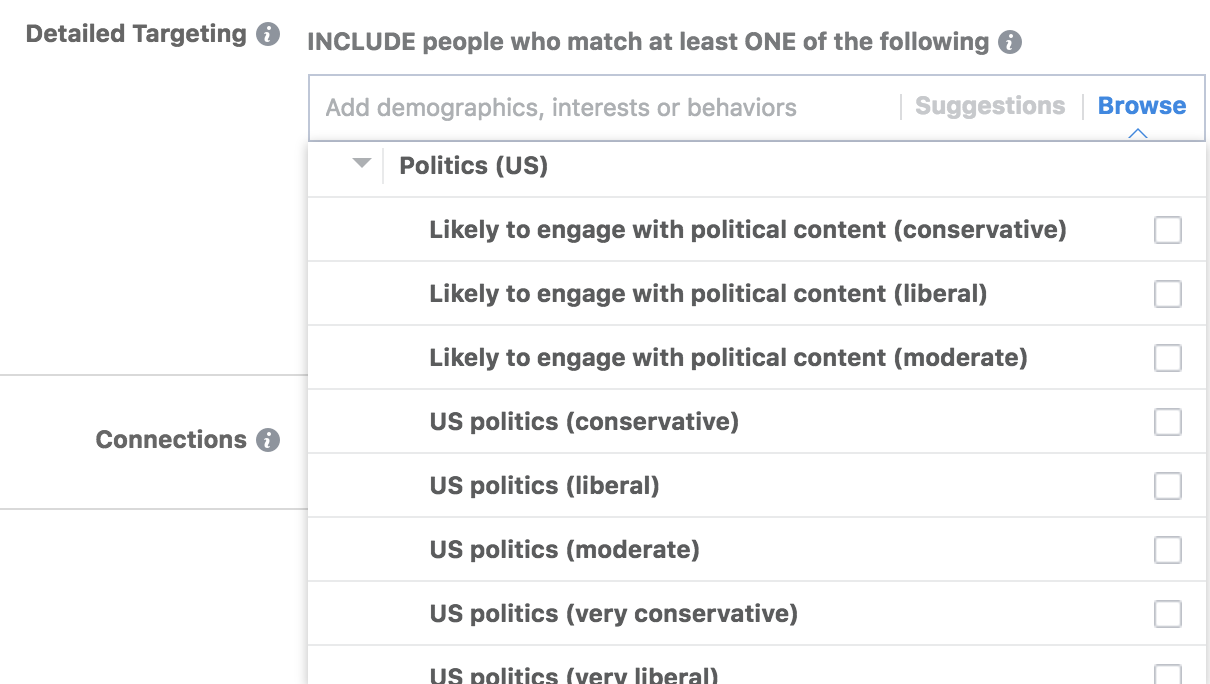
Notice that you can select multiple choices from the Detailed Targeting, and by default it will be anyone who matches at least one of your choices.
You can also choose to narrow your audience or exclude people based on their interests or demographics. In the example below, you can see that I chose people who are liberal AND are environmentalists. Knowing that this topic is important to my audience will make it easy for me to know what to say when I create my ad.
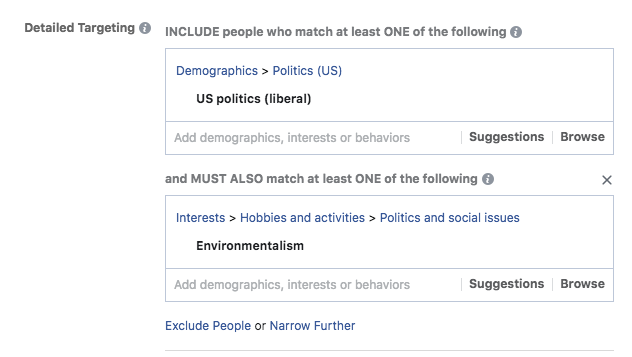
As you build your audience, note the size on the right hand side. You will see how many people meet your criteria as you edit your audience.

As a general rule, I recommend spending $1 per day for every 1,000 people in your audience. In this example, there are only 3,500 liberals who are also environmentalists. If I spent $3.50 per day on this audience, my ad would most likely show up at least once to all 3,500 people within a month. I can then increase the spending to show the ads more frequently.
This “Rule of One” as we call it at 9 Clouds, is a great starting point to decide if your audience is narrow enough and if your budget is large enough for the audience you create.
Placements
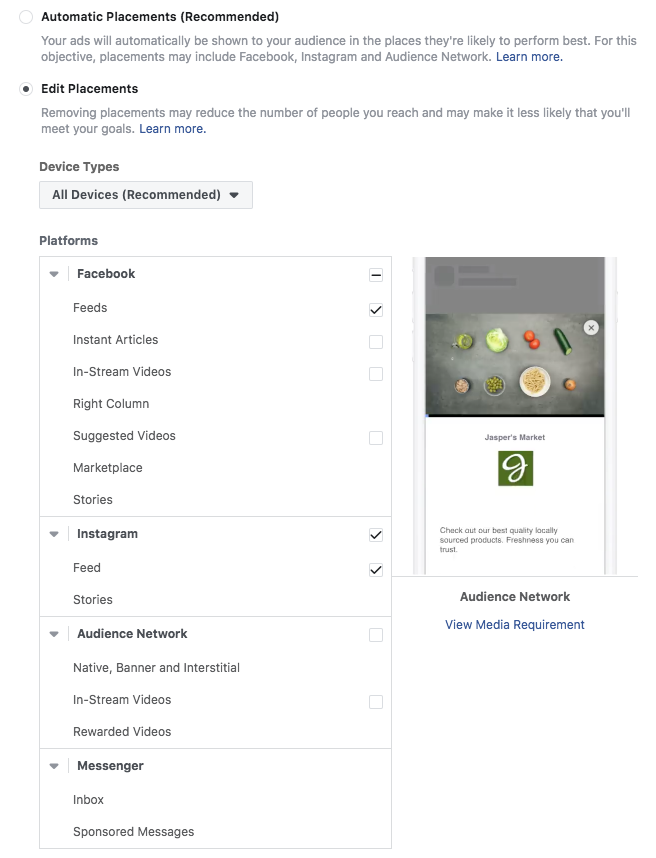
After you build your audience, Facebook will ask you where you want your ads. Actually, they will try to get you to place your ads everywhere. Don’t fall for it.
Remove your ads from the audience network. I also don’t like my ads showing up in people’s Facebook Messenger as that feels intrusive to me. Usually I end up with a targeting as shown below.
Lastly, pick your budget, (maybe use the Rule of One from above) and how you want to pay and measure your ads, and then head over to the third and final step: ad creation.
Choosing Images, Text and Videos to Use on Facebook Ads
Finally, you made it! Let’s create an ad.
In the final step, you’ll choose what to say and what to show. The first choice is whether you want to create a new message or use an existing post from your page. For many campaigns, a great strategy is to first upload a video or photo onto your page, let your best supporters share and like it, and then put some ad dollars behind it to help the most important people see.
Never boost a post. Promote a post instead.
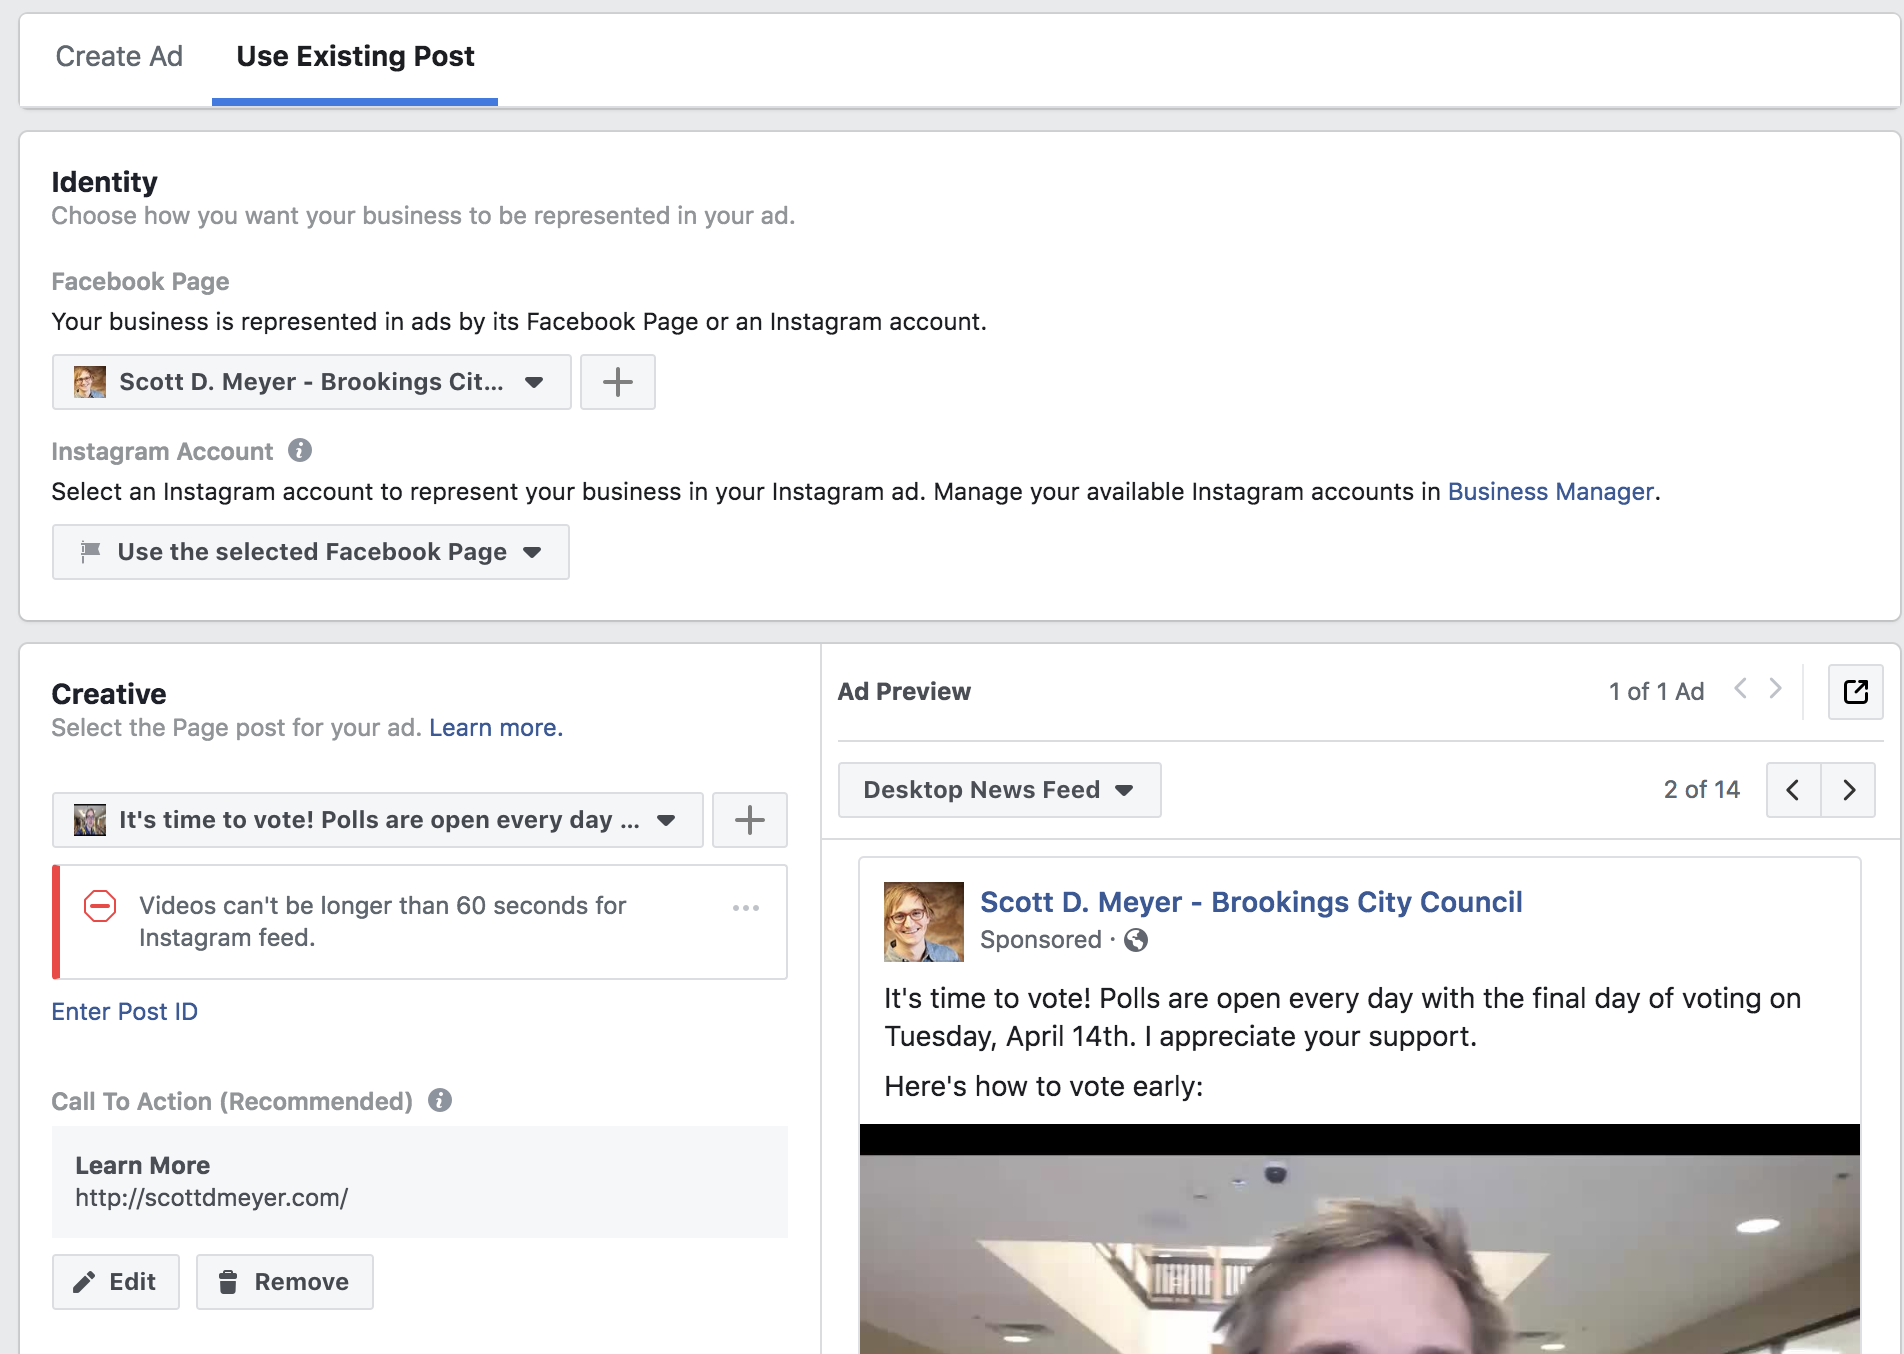
Facebook makes it very easy to click “boost post” on your Facebook page. The problem with a boosted post is that it lacks many of the targeting tools you have on the business manager. If you want more people to see something you put on your Facebook page, create your ad and choose “Use Existing Post.”
Make sure you are using your Facebook page, and under the Creative, choose the post you want to share. You can edit the “call to action” so when people watch or see your post, they can click to take action.
If you want to share a specific message to a specific audience, create an ad. This allows you to test multiple messages to different audiences and discover what works.
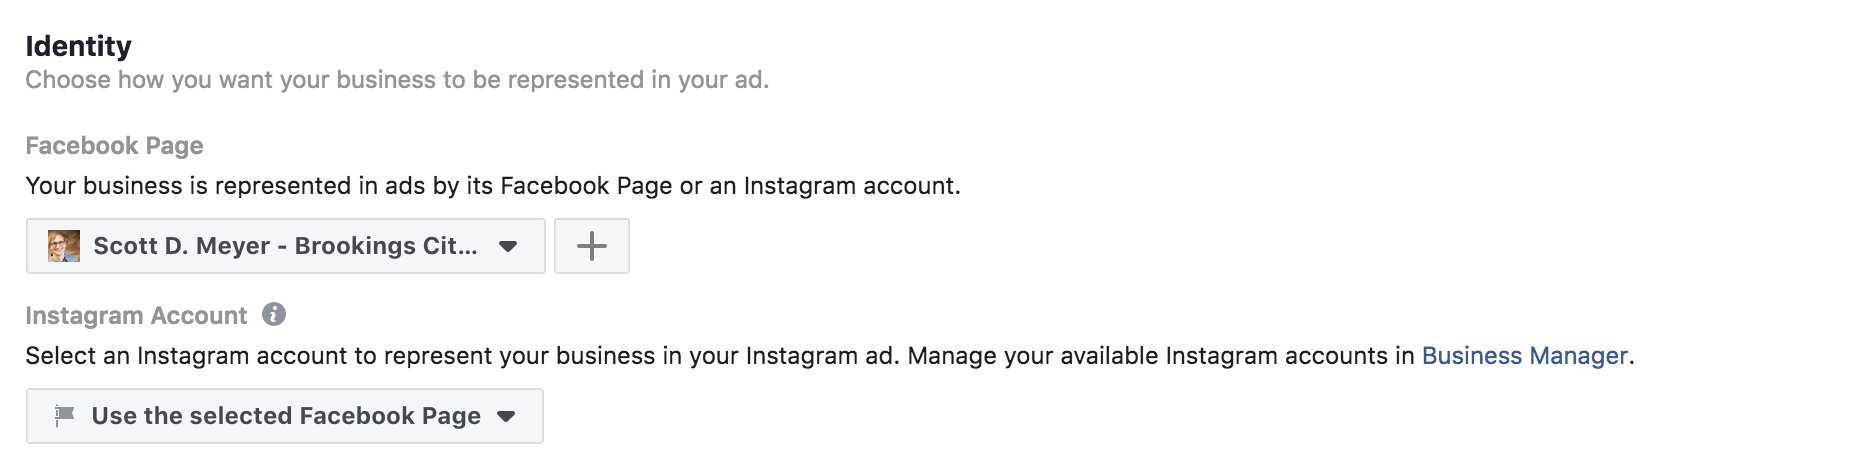
Click Create Ad on the top left. Choose your page under Identity.
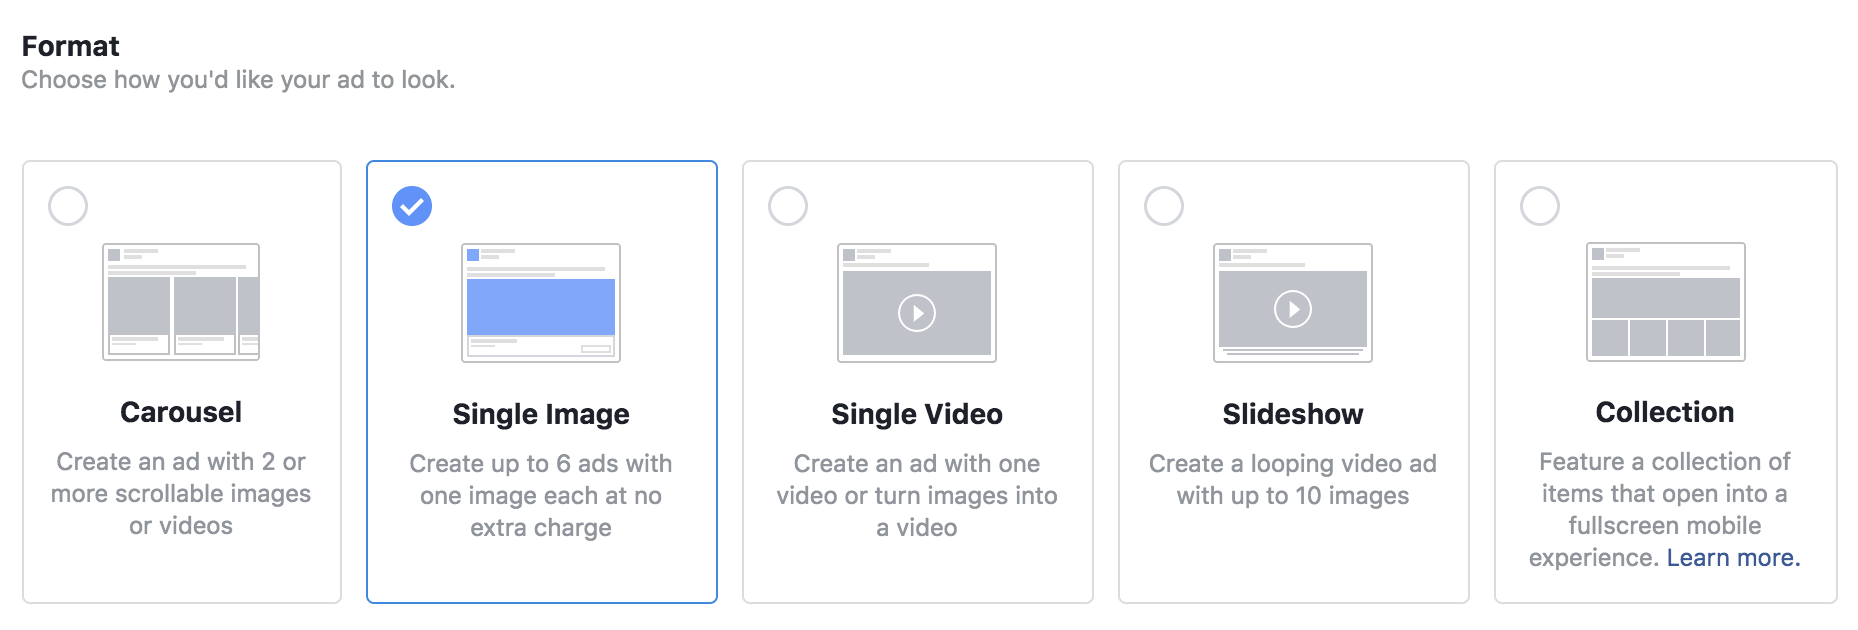
After you choose your identity, you then get to decide what your ad will look like. Most commonly, you will share a single image or video. Also, a great strategy is to use a carousel ad to showcase the most important messages to your campaign. Facebook will automatically put the most popular “card” (or image) to the front.
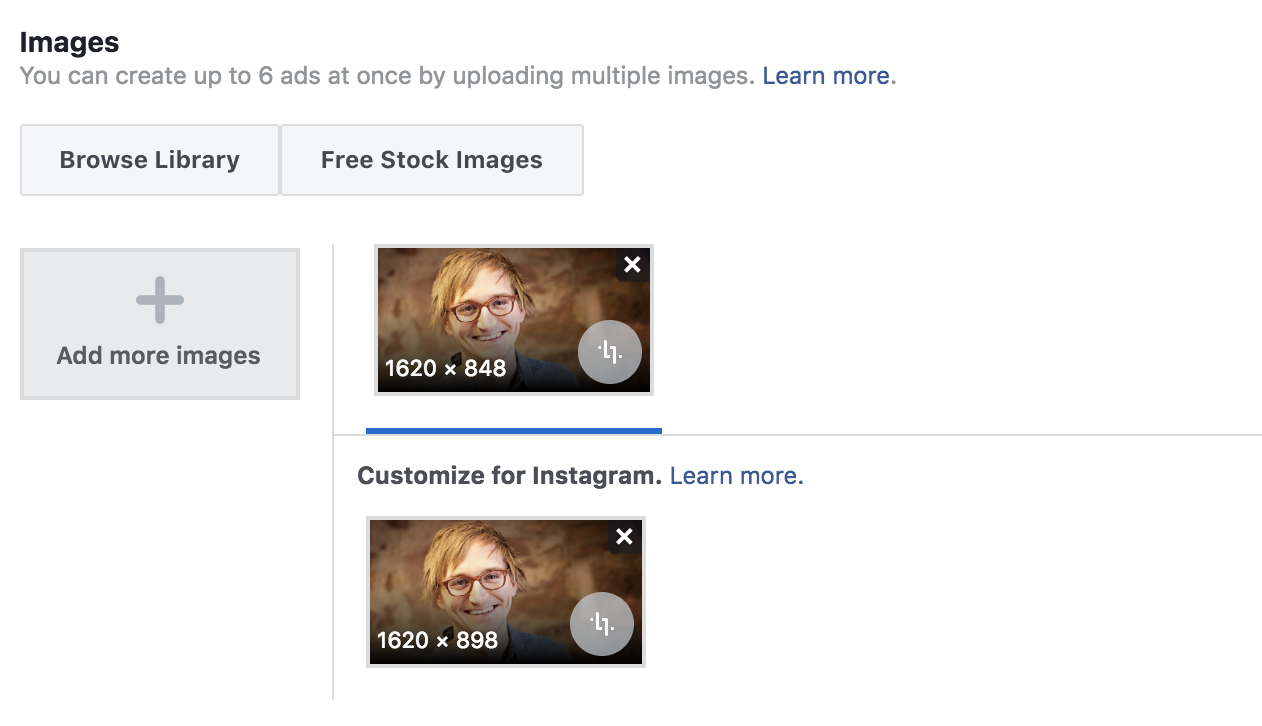
After you choose your format, you can then pick the image or video that will be on your Facebook and Instagram ad. Once you have uploaded an image/video, it will be available in your library, so you can click Browse Library to find it. Also, if you have uploaded an image to your Facebook page, you can also find it in your library.
If the image or video is new, click upload image (or add more images).
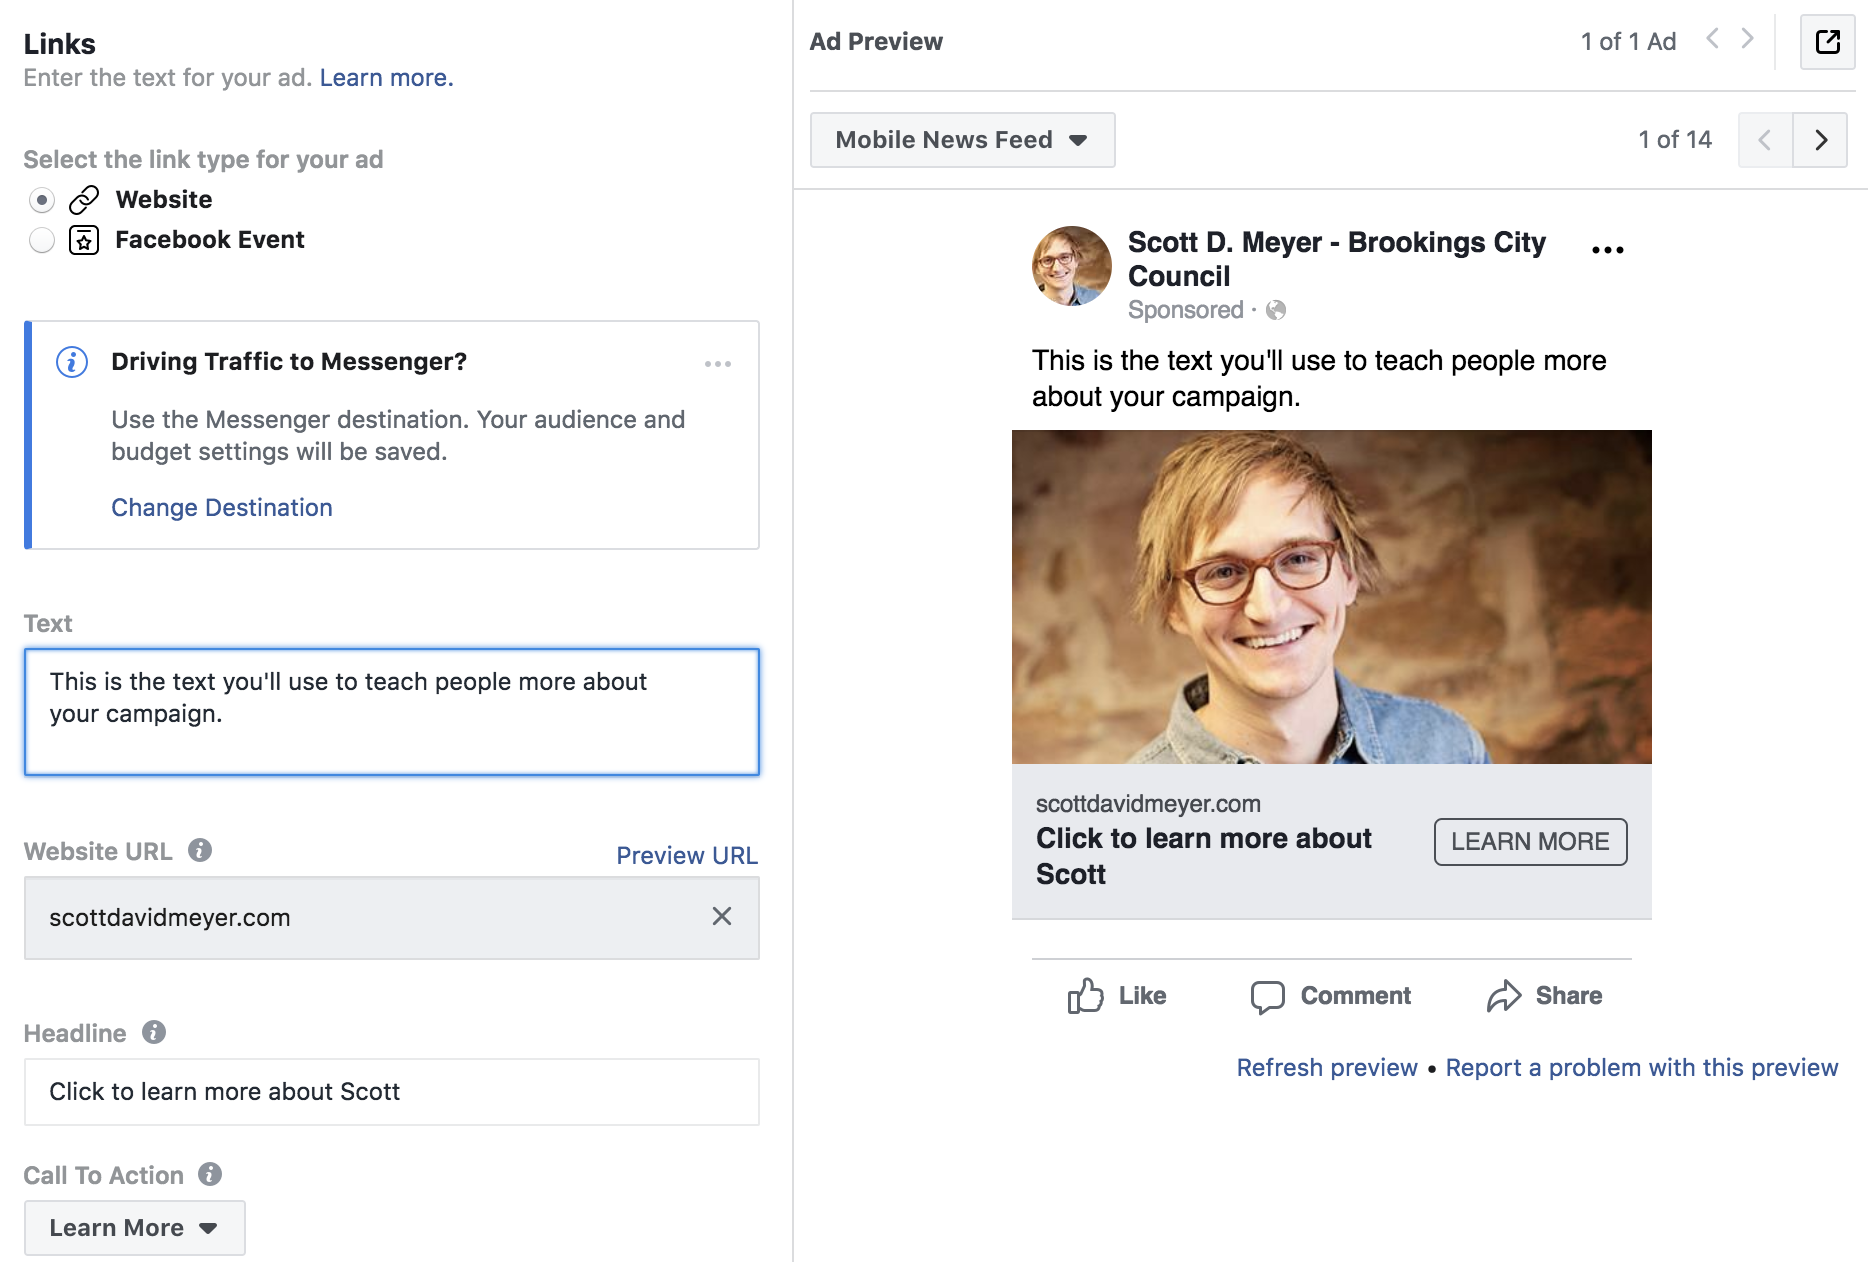
Now the fun part. The ad appears!
On the right hand side, you will see what your ad looks like. You can change the preview depending on the device the viewer is using. You can see in this screenshot it is a mobile preview. Just click the dropdown menu under Ad Preview to see how it looks in various formats. I typically make sure it looks good for mobile phones since that is how most people will see it.
On the left hand side is where you will make edits. Choose website to drive traffic to your website. Then type in the text, headline, URL and choose the call to action. You will see it update in real time on the right hand side.
If you want to stop there, great! Your ad is ready to go.
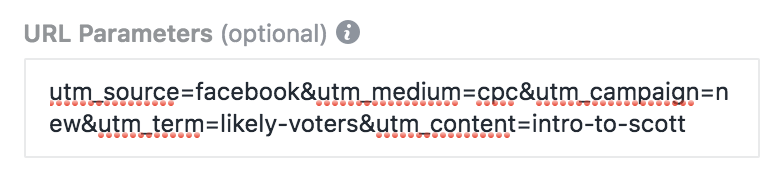
You can take things a step further to effectively measure your ads. If you use a tool like Google Analytics, you can see exactly how well each individual ad is performing.
To get started, make sure you click Advanced Settings. In the URL Parameters, enter the following:
utm_source=facebook&utm_medium=cpc&utm_campaign=Scott-Intro&utm_term=liberal-voters&utm_content=video-intro
The bold text should be edited. Where Scott-Intro is, you will want to put the name of your campaign. Where liberal-voters is, you will want to add your audience. Where video-intro is, you will want to describe your ad.
 After your URL parameters are setup, you will see your ad performance on Google Analytics. You can look at traffic sources and add a second dimension. Just search for source, medium, campaign, term or content to find how everything is working.
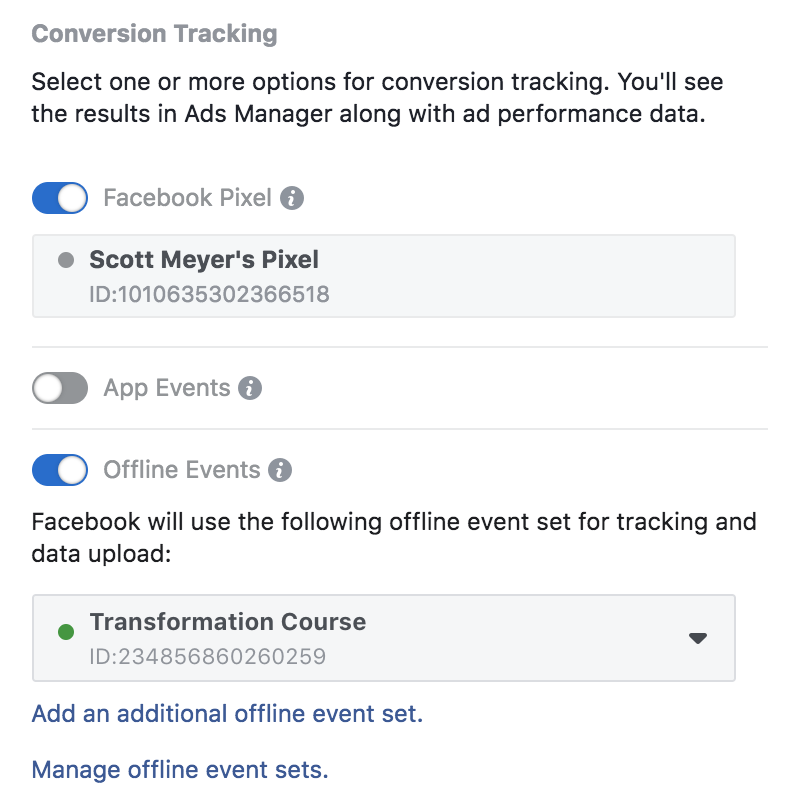
Lastly, make sure you click on Facebook Pixel and Offline Events if you have them created.
Integrate Your Ads with Your Campaign (and make it easy for next time)
Now that your first ad is created, things get easier!
In Business Manager, click the hamburger and choose Ads Manager and you will see all of your campaigns. You can click the campaign name to see the ad set and click the ad set to see the ads. At any level, you choose duplicate.
Duplication will help you easily launch future ads. If you duplicate an ad, for example, it will keep the campaign and audience (ad set), so you just need to update your ad.
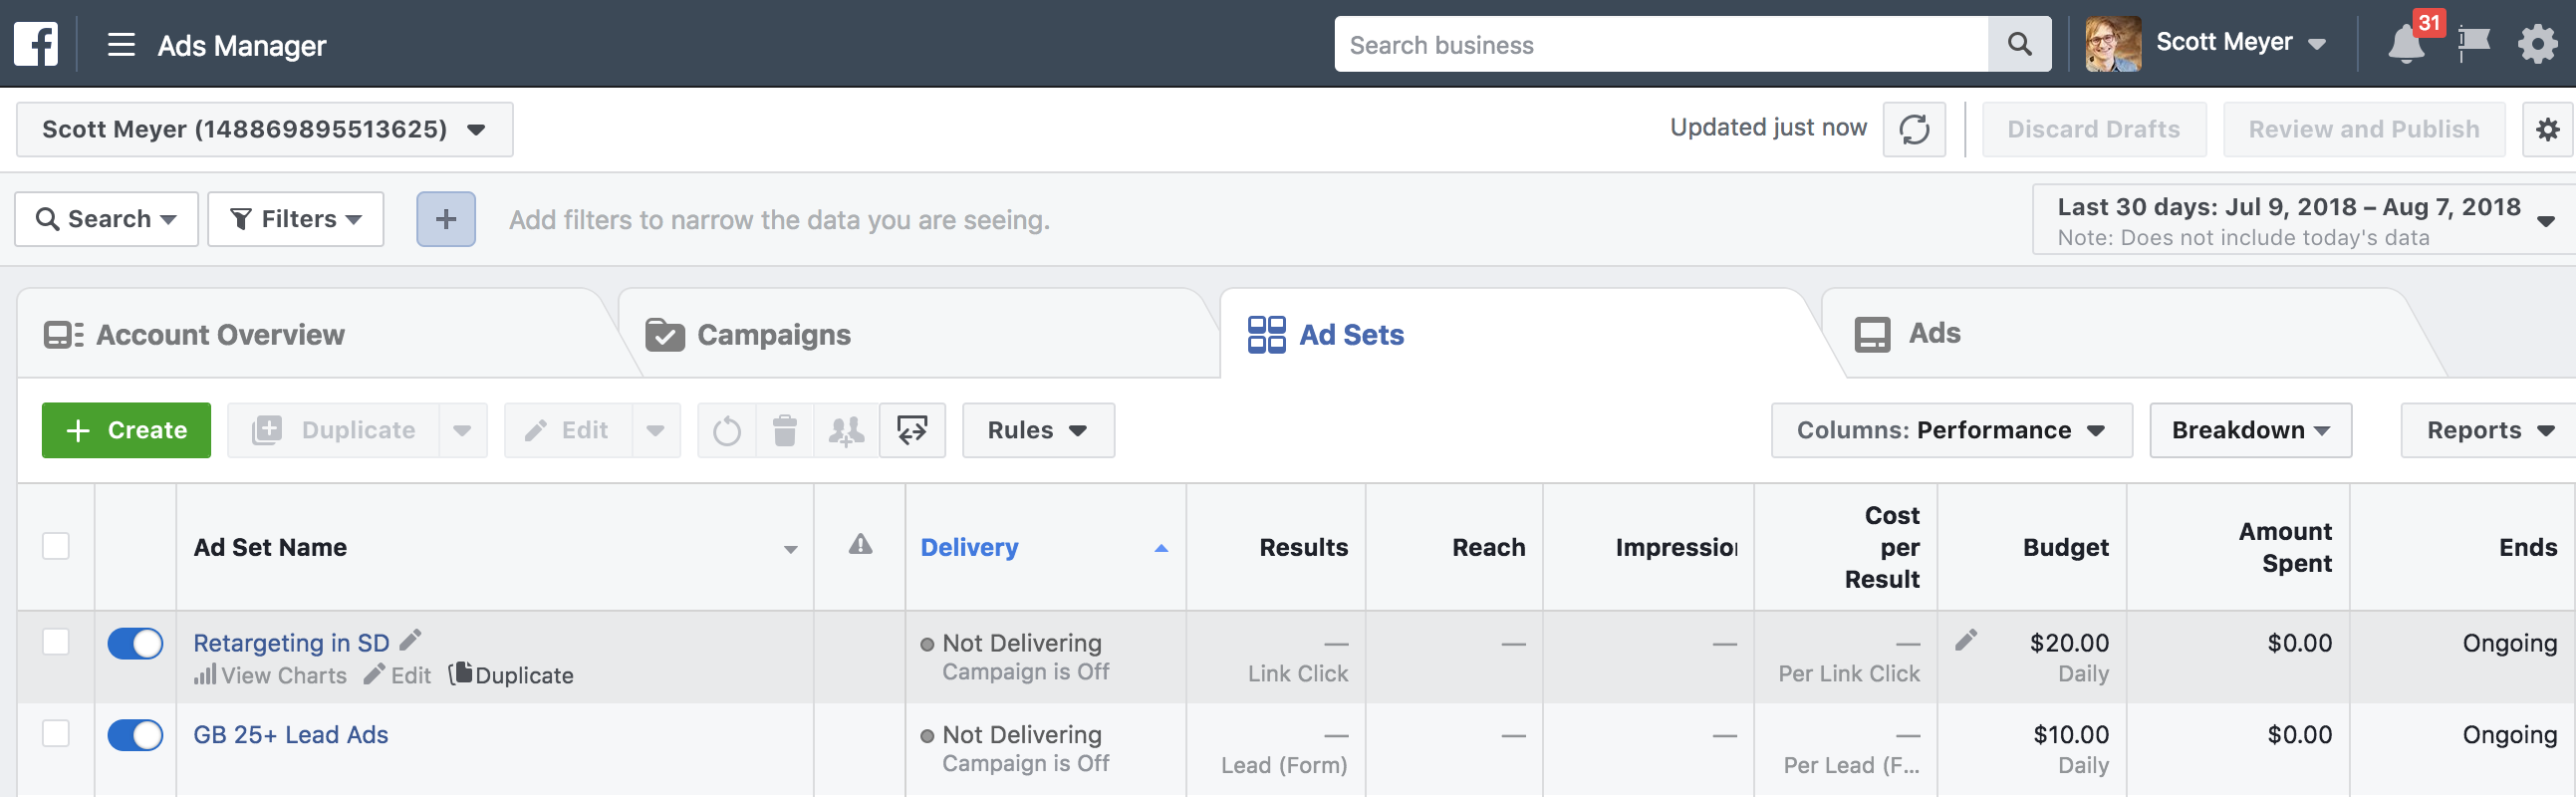
Similarly, you can duplicate an existing audience and it will duplicate any corresponding ads. After you get through the entire process, duplicate the ad set, choose a new audience, and try the same ad on that audience. Then you will learn which audience is best for your campaigns.
Now, time to connect the dots.
Facebook is perfect at introducing you to potential voters. It is even more powerful when integrated with your email marketing and donation tool, such as ActBlue.
Learn how to connect everything in the next post. Coming soon!